Part 5 of 5 · Tanstack Aws
Deploy TanStack Start serverless on AWS
Deploy TanStack Start on AWS with streaming API Gateway using AWS CDK
Introduction
This guide demonstrates how to deploy a TanStack Start application on AWS using a serverless architecture. TanStack Start is a full-stack React framework that provides server-side rendering, routing, and data fetching capabilities. We'll deploy it using AWS Lambda, API Gateway with streaming support, CloudFront for CDN, and S3 for static assets.
The complete implementation is available in the tanstack-aws repository, which serves as a working example and template for this deployment pattern.
Disclaimer
This is a straightforward implementation guide focused on the core deployment architecture. It does not cover production best practices such as WAF, comprehensive monitoring, structured logging, automated CI/CD pipelines, or security hardening. Use this as a starting point and extend it with production-grade features as needed.
Architecture
The deployment architecture consists of the following AWS services:
- AWS Lambda: Runs the TanStack Start server-side rendering with Node.js 24.x runtime
- API Gateway (REST API): Provides HTTP endpoint with streaming support for Lambda responses
- CloudFront: CDN for distributing both dynamic and static content globally
- S3: Hosts static assets (JavaScript, CSS, images) generated during build
- IAM: Manages permissions for Lambda to access AWS Bedrock (for AI features)
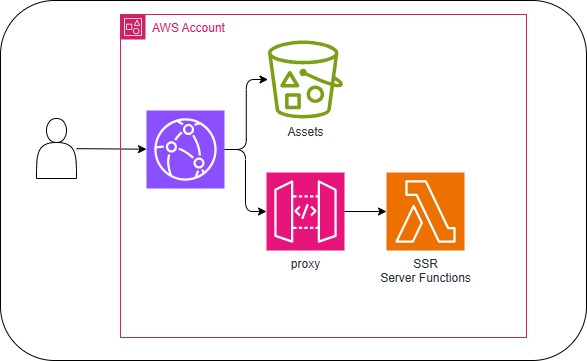
The architecture leverages streaming responses through API Gateway, which is essential for server-side rendering and AI-powered features that stream content to the client.
Implementation Steps
Create the TanStack Start App
Start by creating a new TanStack Start application using the official CLI as described in the TanStack Start Quick Start:
npm create @tanstack/startWhen prompted, select Nitro as the deployment adapter since it provides a built-in AWS Lambda preset with streaming support.
Organize Project Structure
Move the generated TanStack application files to a src/webapp directory to separate the web application from the infrastructure code. This allows you to maintain both the CDK infrastructure and the application in the same repository.
Reference: See the project structure in tanstack-aws repository
Configure Vite and Nitro
Update your vite.config.ts to configure Nitro for AWS Lambda deployment with streaming enabled. This configuration is crucial for enabling response streaming:
Reference:
vite.config.ts
const config = defineConfig({
  plugins: [
    devtools(),
    nitro({
      awsLambda: { streaming: true },
      preset: "aws-lambda",
    }),
    viteTsConfigPaths({
      projects: ["./tsconfig.json"],
    }),
    tailwindcss(),
    tanstackStart({
      srcDirectory: "src/webapp",
    }),
    viteReact(),
  ],
});
Key configuration points:
awsLambda: { streaming: true }: Enables response streaming for Lambdapreset: 'aws-lambda': Uses Nitro's AWS Lambda adaptersrcDirectory: 'src/webapp': Points to the application source directory
Set Up AWS CDK Infrastructure
You can maintain the CDK infrastructure code in the same repository as your application. The infrastructure uses several custom constructs to deploy the complete stack.
Reference: All constructs are in
lib/constructs/
Webapp Server Lambda
Create a Lambda function construct that deploys the Nitro build output. The Lambda function runs the server-side rendering and API endpoints.
Reference:
lib/constructs/WebappServer.ts
import { Code, Function, Runtime } from "aws-cdk-lib/aws-lambda";
import { Duration, Tags } from "aws-cdk-lib";
import { Effect, PolicyStatement } from "aws-cdk-lib/aws-iam";
import { Construct } from "constructs";
import path from "node:path";

export class WebappServer extends Construct {
  readonly webappServer: Function;

  constructor(scope: Construct, id: string) {
    super(scope, id);

    this.webappServer = new Function(this, "WebappServer", {
      code: Code.fromAsset(
        path.join(path.dirname(new URL(globalThis._importMeta_.url).pathname), "../../.output/server"),
      ),
      handler: "index.handler",
      memorySize: 2048,
      runtime: Runtime.NODEJS_24_X,
      timeout: Duration.seconds(60),
    });
    Tags.of(this.webappServer).add("IsWebAppServer", "true");

    this.webappServer.addToRolePolicy(
      new PolicyStatement({
        actions: ["bedrock:InvokeModel", "bedrock:InvokeModelWithResponseStream"],
        effect: Effect.ALLOW,
        resources: ["*"],
      }),
    );
  }
}
Important details:
- Code source: Points to
.output/servergenerated by Nitro's build process (nitro build) - Handler:
index.handleris the default entry point created by Nitro - Memory: 2048 MB provides adequate resources for SSR operations
- Runtime: Node.js 24.x for latest features and performance
- Bedrock permissions: Added for AI chat functionality (optional, remove if not needed)
Assets Bucket and Deployment
Create an S3 bucket to host static assets generated during the build process:
Reference:
lib/constructs/WebappAssetsBucket.ts
import { Bucket } from "aws-cdk-lib/aws-s3";
import { Construct } from "constructs";

export class WebappAssetsBucket extends Construct {
  readonly assetsBucket: Bucket;
  constructor(scope: Construct, id: string) {
    super(scope, id);

    this.assetsBucket = new Bucket(this, "AssetsBucket");
  }
}
Use the BucketDeployment construct to automatically upload static assets to S3 after each build and invalidate the CloudFront cache:
Reference:
lib/constructs/WebappAssetsDeployment.ts
import { BucketDeployment, Source } from "aws-cdk-lib/aws-s3-deployment";
import { Bucket } from "aws-cdk-lib/aws-s3";
import { Construct } from "constructs";
import type { Distribution } from "aws-cdk-lib/aws-cloudfront";
import path from "node:path";

type WebappAssetsDeploymentProps = {
  assetsBucket: Bucket;
  distribution: Distribution;
};

export class WebappAssetsDeployment extends Construct {
  constructor(scope: Construct, id: string, props: WebappAssetsDeploymentProps) {
    super(scope, id);

    const { assetsBucket, distribution } = props;

    const sourcePath = path.join(
      path.dirname(new URL(globalThis._importMeta_.url).pathname),
      "../../.output/public",
    );

    new BucketDeployment(this, "AssetBucketDeployment", {
      destinationBucket: assetsBucket,
      distribution,
      distributionPaths: ["/*"],
      sources: [Source.asset(sourcePath)],
    });
  }
}
Key features:
- Source: Points to
.output/publicwhere Nitro generates static assets - Cache invalidation:
distributionPaths: ["/*"]invalidates CloudFront cache on deployment - Automatic deployment: Runs during CDK deployment to sync assets
API Gateway with Streaming
Create a REST API Gateway that integrates with the Lambda function and enables streaming responses:
Reference:
lib/constructs/WebappApi.ts
import { EndpointType, LambdaRestApi, ResponseTransferMode } from "aws-cdk-lib/aws-apigateway";
import { Construct } from "constructs";
import { Function } from "aws-cdk-lib/aws-lambda";

type WebappApiProps = {
  webappServer: Function;
};

export class WebappApi extends Construct {
  readonly webappApi: LambdaRestApi;

  constructor(scope: Construct, id: string, props: WebappApiProps) {
    super(scope, id);

    const { webappServer } = props;

    this.webappApi = new LambdaRestApi(this, "WebappApi", {
      endpointConfiguration: {
        types: [EndpointType.REGIONAL],
      },
      handler: webappServer,
      integrationOptions: {
        responseTransferMode: ResponseTransferMode.STREAM,
      },
    });
  }
}
Critical configuration:
ResponseTransferMode.STREAM: Enables streaming responses from Lambda, essential for SSR and AI streamingLambdaRestApi: Automatically creates proxy integration for all routes
CloudFront Distribution
Set up CloudFront to serve both dynamic content (from API Gateway) and static assets (from S3):
Reference:
lib/constructs/WebappDistribution.ts
import {
  AllowedMethods,
  CachePolicy,
  Distribution,
  OriginRequestPolicy,
  PriceClass,
  ResponseHeadersPolicy,
  ViewerProtocolPolicy,
} from "aws-cdk-lib/aws-cloudfront";
import { Construct } from "constructs";
import { RestApiOrigin, S3BucketOrigin } from "aws-cdk-lib/aws-cloudfront-origins";
import type { Bucket } from "aws-cdk-lib/aws-s3";
import type { RestApi } from "aws-cdk-lib/aws-apigateway";

type DistributionProps = {
  webappServerApi: RestApi;
  assetsBucket: Bucket;
};

export class WebappDistribution extends Construct {
  public readonly distribution: Distribution;

  constructor(scope: Construct, id: string, props: DistributionProps) {
    super(scope, id);

    const { webappServerApi, assetsBucket } = props;

    const s3BucketOrigin = S3BucketOrigin.withOriginAccessControl(assetsBucket);

    const defaultBehavior = {
      allowedMethods: AllowedMethods.ALLOW_ALL,
      cachePolicy: CachePolicy.CACHING_DISABLED,
      origin: new RestApiOrigin(webappServerApi),
      originRequestPolicy: OriginRequestPolicy.ALL_VIEWER_EXCEPT_HOST_HEADER,
      responseHeadersPolicy: ResponseHeadersPolicy.SECURITY_HEADERS,
      viewerProtocolPolicy: ViewerProtocolPolicy.REDIRECT_TO_HTTPS,
    };

    const staticAssetBehavior = {
      cachePolicy: CachePolicy.CACHING_OPTIMIZED,
      origin: s3BucketOrigin,
      viewerProtocolPolicy: ViewerProtocolPolicy.REDIRECT_TO_HTTPS,
    };

    this.distribution = new Distribution(this, "Distribution", {
      additionalBehaviors: {
        "/assets/*": staticAssetBehavior,
        "/favicon.ico": staticAssetBehavior,
        "/images/*": staticAssetBehavior,
        "/site.webmanifest": staticAssetBehavior,
      },
      defaultBehavior,
      priceClass: PriceClass.PRICE_CLASS_100,
    });
  }
}
Key configuration:
- Default behavior: Routes all requests to API Gateway with caching disabled (for dynamic SSR content)
- Additional behaviors: Routes specific paths (
/assets/*,/images/*, etc.) to S3 with optimized caching - Origin Access Control: Uses OAC (recommended over OAI) for secure S3 access
- Security headers: Automatically adds security headers to responses
- Price class:
PRICE_CLASS_100uses edge locations in North America and Europe (adjust as needed)
Wire Everything Together
Create a main construct that integrates all the components:
Reference:
lib/constructs/Webapp.ts
import { Construct } from "constructs";
import { WebappDistribution } from "./WebappDistribution.ts";
import { WebappServer } from "./WebappServer.ts";
import { WebappAssetsDeployment } from "./WebappAssetsDeployment.ts";
import { WebappAssetsBucket } from "./WebappAssetsBucket.ts";
import { WebappApi } from "./WebappApi.ts";

export class Webapp extends Construct {
  constructor(scope: Construct, id: string) {
    super(scope, id);

    const webappServer = new WebappServer(this, "WebappServer");

    const webappApi = new WebappApi(this, "WebappApi", {
      webappServer: webappServer.webappServer,
    });

    const assetsBucket = new WebappAssetsBucket(this, "WebappAssetsBucket");

    const distribution = new WebappDistribution(this, "WebappDistribution", {
      assetsBucket: assetsBucket.assetsBucket,
      webappServerApi: webappApi.webappApi,
    });

    new WebappAssetsDeployment(this, "WebappAssetsDeployment", {
      assetsBucket: assetsBucket.assetsBucket,
      distribution: distribution.distribution,
    });
  }
}
This construct orchestrates the deployment by:
- Creating the Lambda function with the server code
- Setting up API Gateway to route requests to Lambda
- Creating the S3 bucket for static assets
- Configuring CloudFront distribution with proper routing
- Deploying static assets and invalidating the cache
Build and Deploy
To build and deploy the application:
# Install dependencies
pnpm install

# Build the TanStack Start application
pnpm webapp:build

# Deploy the CDK stack
pnpm cdk deployReference: See
package.jsonfor all available scripts
Build process:
pnpm webapp:buildrunsvite build, which uses Nitro to compile the app- Nitro generates two outputs:
.output/server/- Lambda function code.output/public/- Static assets
- CDK deployment packages the Lambda code and uploads static assets to S3
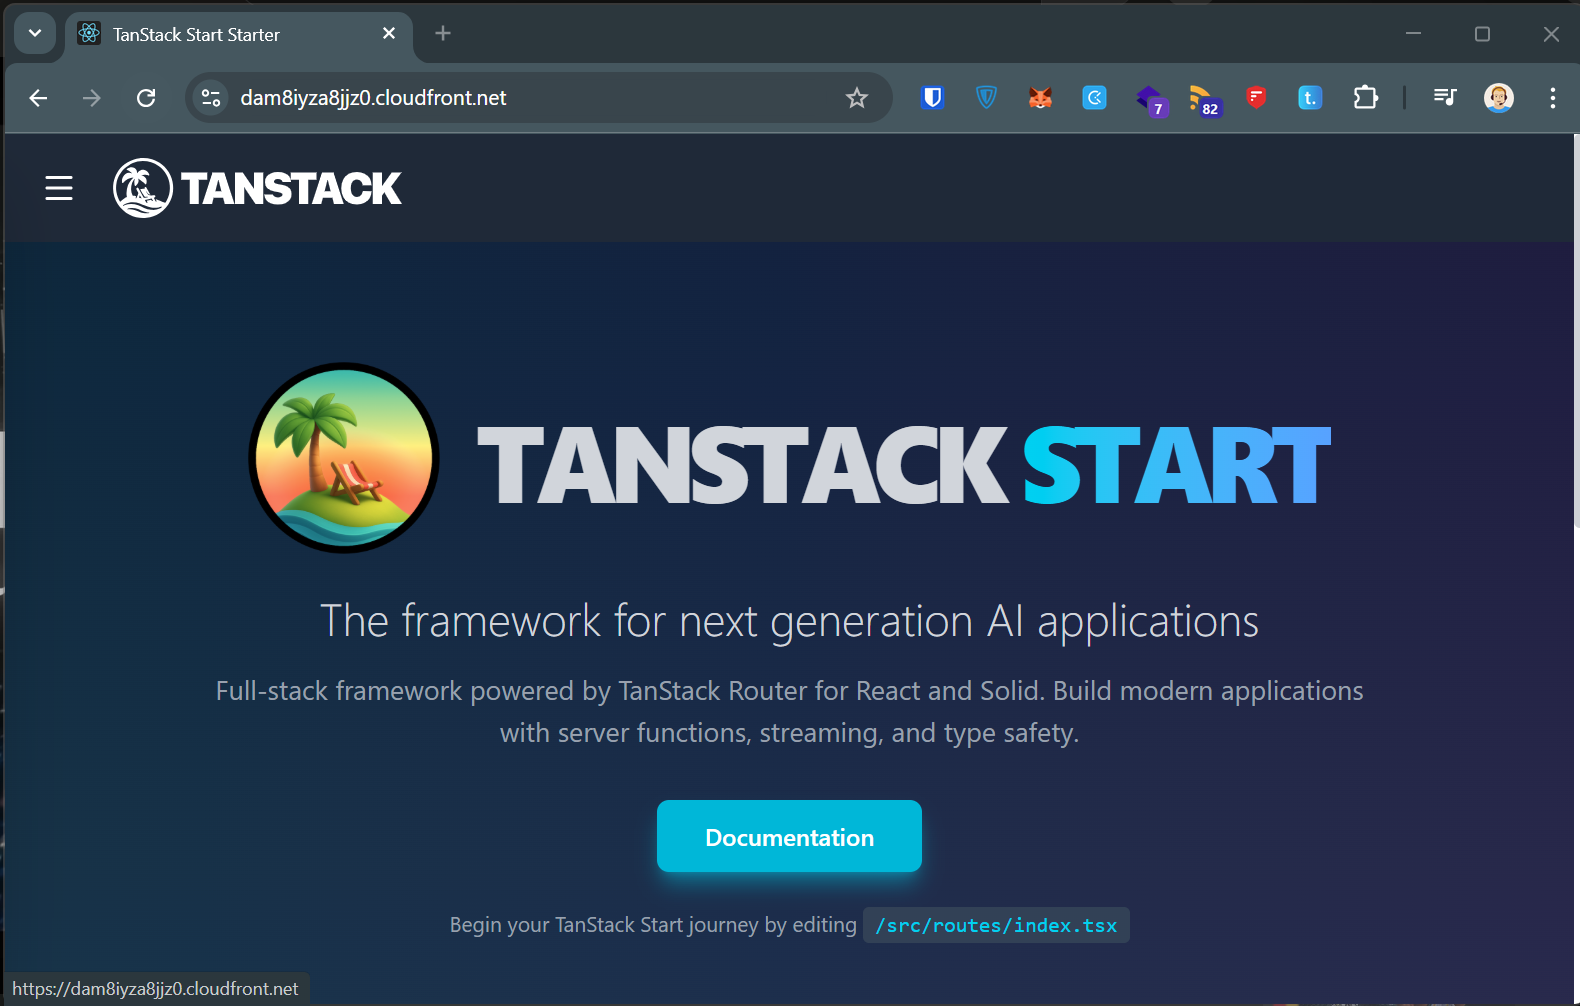
Results
After deployment, you'll receive a CloudFront URL where your application is accessible. The architecture provides:
- Fast global delivery: CloudFront CDN serves content from edge locations
- Efficient caching: Static assets cached at edge, dynamic content from Lambda
- Streaming support: Real-time responses for SSR and AI features
- Scalability: Auto-scaling Lambda functions handle traffic spikes
Example Deployment
The template repository includes a demo chat application powered by AWS Bedrock (Claude AI) with streaming responses:
Key Dependencies
The implementation relies on these main packages (see package.json for exact versions):
TanStack ecosystem:
@tanstack/react-start- Full-stack React framework@tanstack/react-router- File-based routing@tanstack/react-query- Data fetching and caching@tanstack/store- State management
Build tools:
nitro- Universal JavaScript server with AWS Lambda presetvite- Frontend build tooltailwindcss- Utility-first CSS framework
AWS infrastructure:
aws-cdk-lib- AWS Cloud Development Kitconstructs- CDK construct library
Alternative Deployment Options
While this guide focuses on API Gateway, the template repository also demonstrates Lambda Function URLs as an alternative origin. Function URLs provide a simpler setup but may require additional configuration for authentication (e.g., Lambda@Edge for SigV4 signing).
Note: The commented code in the reference implementation shows the Function URL approach for comparison.
Sources and References
- Template repository: github.com/JohannesKonings/tanstack-aws
- TanStack Start: tanstack.com/start
- Nitro framework: nitro.unjs.io
- AWS CDK: docs.aws.amazon.com/cdk
- Inspired by: github.com/zhe/tanstack-start-aws-cdk